After many years dreaming of the perfect outdoor kitchen and entertaining space, we finally decided to make that dream come true!
Below are the before and after pictures of the full project. Yes, it's really the same place!


Before beginning, we looked at many DIY outdoor kitchen ideas. We finally decided to build our own using the outdoor living kits by Necessories that uses the Rockwood Retaining Wall blocks.
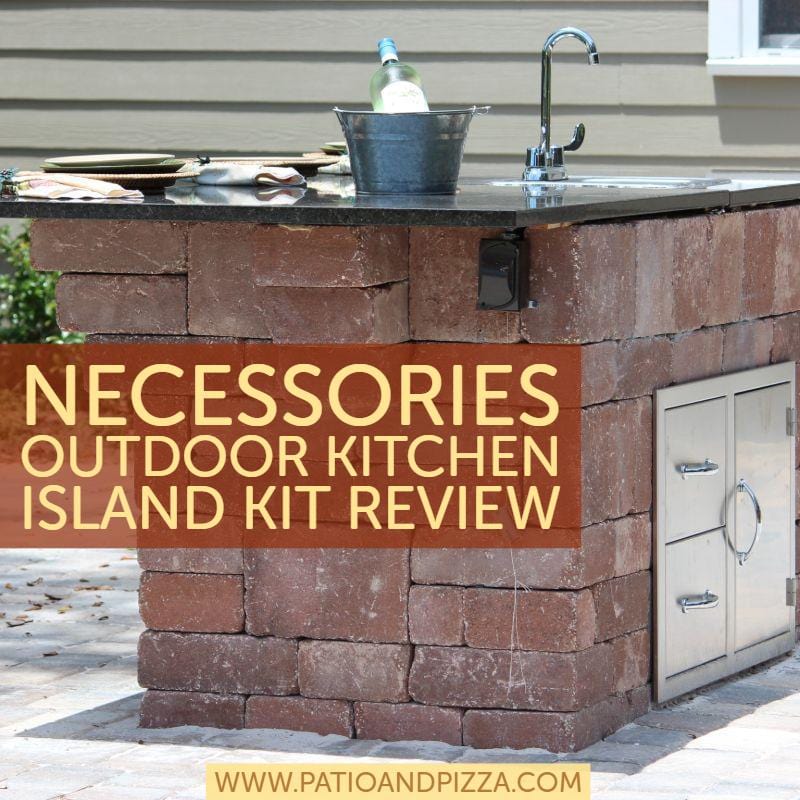
The focal point of our DIY outdoor kitchen project is a gorgeous granite-topped island with a stainless steel sink, 2-drawers, and storage space underneath.
We were able to build the island using the Necessories Kitchen Island Cabinet Kit (with the Desert colored blocks) which was awesome because it came on a few pallets with everything needed to get the job done. We just had to read the instructions and do the work (and by "do the work", I mean we enlisted the help of the Paved 2 Perfection paver guys and followed directions)!
Below is the recount of our installation, our review of the Necessories Outdoor Living Kit and some of the things we learned along the way. Enjoy!
For starters, we had awesome paver work done by Paved 2 Perfection. They were able to completely transform a boring, weed-infested yard into a gorgeous outdoor entertaining area with beautiful paver work.

The recommendation for base of the Outdoor Kitchen Kits is either poured slab or compacted gravel as shown below:
Concrete Base Foundation:
-4" deep
-4" outside perimeter of base
-Reinforce with 6" x 6" no. 10 WWM
-Compact sub-base soils to 95% of standard proctor (ASTM D698)
Aggregate Base Foundation:
-6" deep
-8" outside perimeter of base
-Compact sub-base soils to 95% of standard proctor
-Compact aggregate base to 95% of standard proctor (ASTM D698)
We chose to go with a compacted gravel base.

As we prepped the areas we needed for our DIY project, we used wood to help us visualize where the base of the island would sit and also where the island countertop would overhang.

IMPORTANT TIP:
Before completing your base and/or paver work, make sure you plan for any plumbing and electricity before building your prefab outdoor kitchen kit. Once you start building, you don't want any do-overs! Do your research and be sure to enlist an experienced and trusted company like Sydney electrical services and plumbing services in your area, to ensure all the work is completed to the highest standard.
With that said, we did NOT schedule the electrician or plumber in a timely manner and did have to pull up a few blocks to run the electrical conduit and the water line. Oops!

Next, we made sure the ground was level and prepared properly.
IMPORTANT TIP:
As you build your island and add new blocks, you'll use the cement (included with the kit) to secure your blocks. So, it won't be easy to make changes to the island once you start gluing blocks.

Before building the island blocks, we had the electrician run electricity for 3 outlets which was much easier for him then waiting until after the island was built. We also had the plumber cap off the incoming water line and prepare the drain pipe.
IMPORTANT TIP:
You can get the island without a sink so you may not need a plumber. And, if you don't need electricity around your island, you can skip the electrician so it would be a much easier DIY project!

Next, we just started adding each block as shown in the Necessories Installation Guide. We found it easier to separate the Rockwood blocks into groups based on their size and shape. That way it was easier to find the correct blocks when needed.

The Necessories Island Cabinet installation guide was easy to follow. Seriously, it was as easy as small - medium - large... we just put the correct block where the instructions told us to put them.

We did find a few specialty blocks in the kit that had a unique shape or cut that was used for special purposes (like to hold the metal piece for the cabinets).
So, we found that if something didn't fit exactly, it was probably the wrong block.
IMPORTANT TIP:
When in doubt, measure the blocks to make sure you are putting on the correct one.
Yes, this is me doing what I do best... measuring and double-checking everything!

The DIY Kitchen Island Kit came with everything we needed for the kitchen island including the mortar and metal braces needed above the stainless steel drawers and door component. It's hard to see from the angle of the picture below, but the steel L-bracket is sitting on two of the special-cut blocks mentioned above!

Pretty soon the outdoor kitchen island started looking like it was coming together! Here's a look at the inside of the kitchen island showing the electrical and water lines we ran prior to building the island.

When we built the island blocks to the height where we wanted the electrical outlets, we did not plan as well as we should've. Gasp! We just had the crew cut a small hole in the block large enough for the electrical conduit so we could mount the electrical outlet on the outside of the island. In hindsight, we would've had them cut a larger outlet-sized square so we could've recessed the electrical outlets. Live and Learn!
IMPORTANT TIP:
There are no pre-cut holes for electrical outlets in the Island Kit. Therefore, if you are adding electrical outlets to your island, you will need to cut your own holes where you want to run the outlets.

The most important part was that the project was moving along smoothly and the foreman was happy! :-)

We decided to make sure we were still level as we worked our way up the island build. If one side or block was a little unlevel, a tiny amount of mortar was used to level it out.

Next, we added the granite top. The granite comes in two pieces on a pallet. The granite tops are not light so it takes some muscles to move them into place. It helps to recruit members of the local football team to assist! Work smart, not hard!

To protect the granite countertop pieces, we kept a protective cover on them and used styrofoam on the ground while we were waiting to install the tops.

We also did some measuring and tweaking beforehand to make sure everything was lined up and even on all sides before adding the glue.
IMPORTANT TIP:
Have some shims on hand just in case the granite countertop doesn't sit flush on the blocks. As these blocks will have some divets and bumps, you will find some areas where the granite is not sitting right on the block. At least we found that shims were needed in a few places to level out the countertop perfectly.

Once we were happy with the placement of the granite, we lifted both pieces of granite so glue could be put underneath to hold them down.

If you purchased the island with a sink as we did, the granite is pre-cut with the hole for the sink. So, for the sink, it was as easy as taking the sink out of the box and setting it into the hole in the granite. Then, we attached the plumbing to the sink in the cabinet.
The next step was to add the kitchen island cabinets which consisted of pushing the stainless steel metal cabinet into the island opening.

The Necessories Kits come with silicone so you can caulk all the edges around the sink and drawer cabinet. However, the kit comes with black caulk which we didn't want to use. We decided to use clear caulk so, after buying a tube at Home Depot (or Lowes), we proceeded to caulk where necessary.

When all was said and done, I loved the way this island turned out! All the little details with the layered blocks along with the gorgeous granite countertop make our outdoor kitchen area so unique!

Here's another shot of the final kitchen island.

Building an outdoor kitchen wasn't as hard as we thought and we are super proud of our kitchen island and the entire outdoor area!

When you are ready to create your own outdoor kitchen paradise, don't hesitate to use the Necessories Kitchen Island Cabinet Kit because the results are outstanding! You can also check out the full collection of DIY Outdoor Kitchen Kits here!
Ask any questions in the comments section below!