Your outdoor kitchen is already the spot where everyone gathers when the weather turns nice.
The grill is fired up, the pizza oven is cranking out pies, and friends are hanging around with drinks in hand. But what happens when the sun goes down and the temperature drops? Those perfect outdoor evenings don't have to end just because it gets a little chilly. Adding a wood heating element to your patio keeps the party going long after sunset.
Wood fired features bring warmth, ambiance, and that irresistible glow that makes outdoor spaces feel magical at night. Whether you're looking to extend your outdoor season well into fall and early winter, or you just want to take the chill off during cool summer evenings, the right heating setup transforms your patio from a fair-weather hangout into a year-round destination.

Why Wood Fire Makes Outdoor Spaces Come Alive
There's something primal about gathering around a real fire. It's been bringing people together for thousands of years, and that hasn't changed just because we now have smartphones and outdoor kitchens. When you add wood heating to your patio, you create a natural gathering point that draws people in without even thinking about it.
The warmth from wood fire is different from propane patio heaters or electric infrared heaters. It radiates outward in all directions, warming people and objects rather than just heating air that blows away in the breeze. On a chilly evening, that radiant heat feels wonderful. Your guests can actually feel comfortable rather than huddling under heat lamps or wrapping themselves in blankets.
The visual element matters too. Dancing flames create ambiance that you simply can't get from a gas burner or electric heater. When the sun sets and your wood fire is going, the flickering light plays across faces, casts shadows that move and shift, and creates an atmosphere that makes ordinary Friday nights feel special. Add in the subtle scent of burning hardwood, and you've got a complete sensory experience that elevates your entire outdoor space.
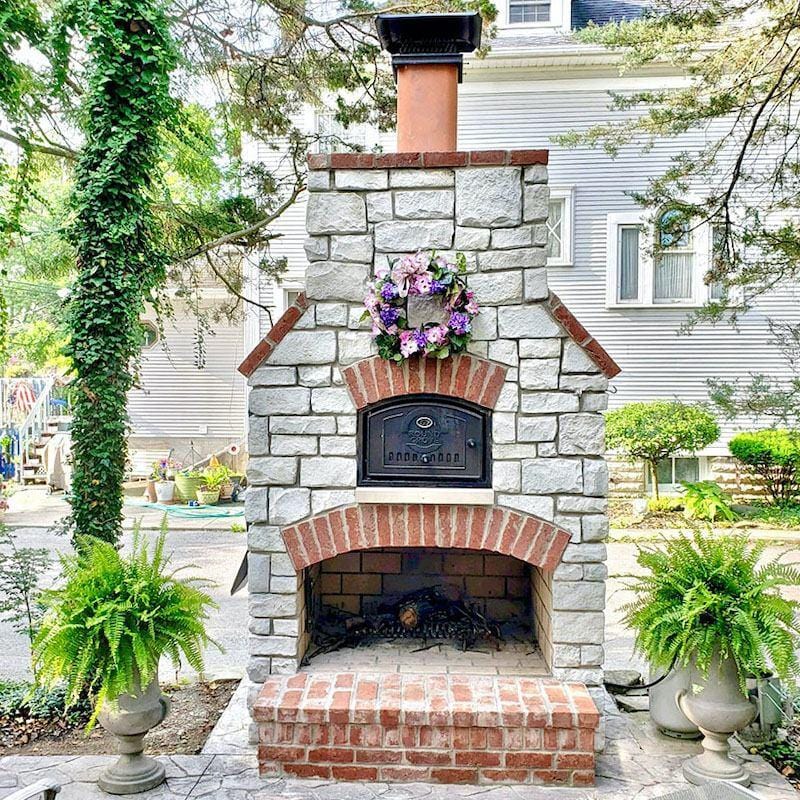
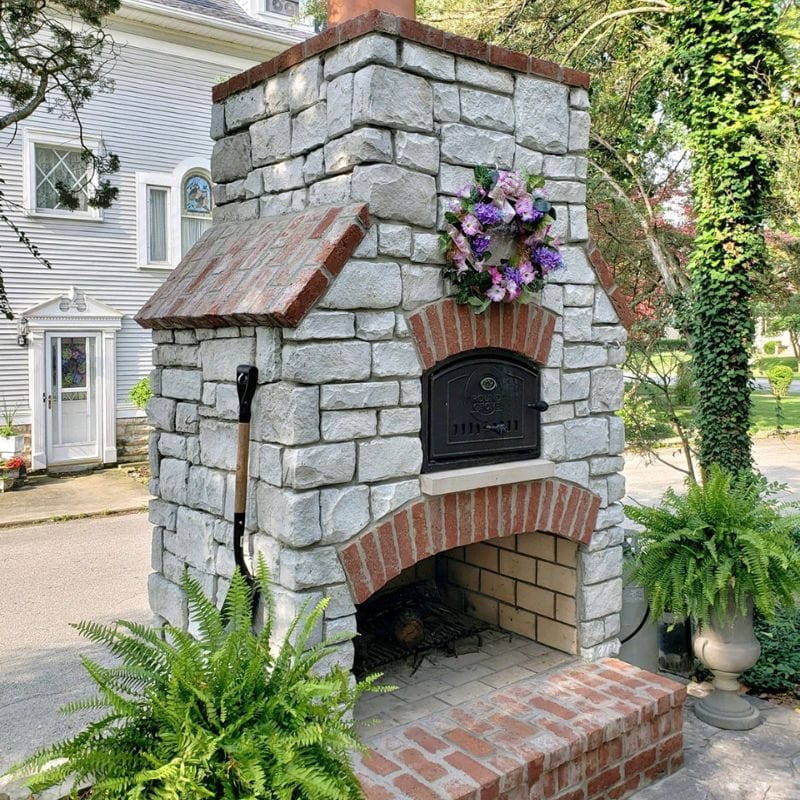
For homeowners with wood fired pizza ovens, adding a wood stove or fireplace to your patio creates beautiful synergy. You're already set up for wood storage and handling. You already appreciate the flavor and experience that wood fire brings to cooking. Extending that to heating your space just makes sense.
Getting the Installation Right From the Start
When you're ready to add wood heating to your patio, understanding the basic requirements saves you headaches down the road. Freestanding wood stoves are popular for outdoor spaces because they offer flexibility, efficiency, and relatively straightforward installation compared to built-in masonry fireplaces.
The chimney system is the critical component that many first-time installers underestimate. Inside your patio cover or pergola structure, where pipe passes through roofs or walls, you need class A chimney pipe specifically rated for that application. This insulated pipe is designed to handle exΩtreme temperatures while protecting your structure from heat. Building codes require it everywhere, and those codes exist because improper installations cause preventable fires.
Many homeowners tackle these installations themselves and do it successfully. Working with complete wood stove pipe kit assemblies makes the process much more manageable. These kits package all the components you need in one shipment - the proper pipe sections, support boxes, flashing assemblies, and termination caps that work together as a system. You avoid the frustration of discovering compatibility issues between parts from different manufacturers or realizing you're missing a critical adapter when you're halfway through installation.
From the stove outlet to where the pipe enters your roof or wall, you'll use connector pipe that's either single-wall or double-wall construction. Single-wall is less expensive but requires 18 inches of clearance to combustible materials. Double-wall pipe allows for tighter installations, which matters in covered patio areas where every inch counts.
Floor protection deserves attention too. Wood stoves need non-combustible hearth pads extending at least 18 inches in front of the loading door and 8 inches to the sides. If you're installing on concrete patio pavers, you likely have adequate protection already. Installing over wood decking or composite materials requires adding proper rated protection first.
Designing Your Patio Layout Around the Fire
Positioning your wood heating element affects how your entire outdoor space functions. Think about traffic flow, seating arrangements, and how people naturally move through your patio when deciding where your stove or fireplace should go.
Many successful patio designs place the heating element opposite or perpendicular to the outdoor kitchen and pizza oven area. This creates two distinct zones - the cooking zone where the action happens, and the lounging zone where people relax with food and drinks. The separation means smoke and heat from your wood stove don't interfere with cooking activities, while still allowing conversation between the two areas.
Consider sight lines from inside your home too. If your kitchen or living room has windows or doors facing the patio, positioning the fire where you can see it from inside extends the visual enjoyment beyond the time you're actually outside. On those really cold nights when you're not brave enough to sit outdoors, you still get to watch the flames dance from the warmth of your indoor space.
Seating arrangement naturally orients toward the heat source. Built-in bench seating, outdoor sofas, or clusters of comfortable chairs should face the fire or wrap around it in a semicircle. Leave enough space for people to move comfortably behind seated guests without squeezing past awkwardly. About 3 to 4 feet of clearance works well for most layouts.
Don't forget about wood storage in your design. You'll need a covered area to keep firewood dry and within easy reach of both your pizza oven and your heating stove if you have both. Many homeowners build dedicated wood storage into their patio design using the same materials as their outdoor kitchen or pizza oven surround. Stacked stone cubbies, wooden bin structures, or metal rack systems can all look great while keeping fuel organized and accessible.
Choosing the Right Size for Your Space
Wood stoves come in various sizes, and bigger is not always better. An oversized stove in a covered patio area can generate uncomfortable heat that drives people away rather than drawing them in. You want enough warmth to counter the chill without turning your patio into a sauna.
For typical covered patio areas ranging from 200 to 400 square feet, small to medium wood stoves rated for 20,000 to 35,000 BTU output work well. These sizes provide adequate heat without overwhelming the space. In open-air patios without overhead coverage, you can go larger since heat dissipates more quickly into the open sky.
The amount of overhead coverage affects heating efficiency dramatically. Fully covered patios with solid roofs retain heat much better than open pergolas with slatted tops. A patio enclosed on three sides with just the front open behaves almost like an indoor room. Completely open patios with just a freestanding stove in the middle lose most of their heat immediately. Match your heating solution to your actual patio configuration.
Consider your climate and how you plan to use the space. In moderate climates where you're taking the edge off cool evenings rather than fighting serious cold, smaller stoves suffice. In northern regions where you want to use your patio when snow is on the ground, you'll need more heat output to maintain comfort.
Think about your typical group size too. Two or three people sitting close to a small stove stay perfectly comfortable. Entertaining groups of ten or twelve requires either a larger heat source or multiple smaller ones positioned strategically around your patio.
Making It Work With Your Pizza Oven Setup
If you already have or plan to install a wood fired pizza oven, coordinating your heating and cooking elements creates a cohesive outdoor kitchen that functions beautifully.
The wood storage solution can serve both features when positioned centrally between them. Build or install a structure that holds enough wood for both pizza making sessions and evening heating. Organize it so kindling and smaller splits used for oven firing are separate from larger logs burned in the stove.
Fuel requirements differ between pizza ovens and heating stoves. Pizza ovens need smaller, drier wood that ignites quickly and burns hot to reach those 700+ degree temperatures for proper pizza cooking. Heating stoves benefit from larger splits of dense hardwood that burn longer and more steadily. Keeping both types on hand means you're prepared for either activity.
Some homeowners find that running both the pizza oven and wood stove simultaneously on cold nights creates an incredibly inviting atmosphere. Fire glowing in two locations, the smell of wood smoke and baking pizza mixing together, friends gathered around both heat sources - these are the evenings people remember and want to recreate.
The visual aesthetic should coordinate too. If your pizza oven is built from stacked stone, consider using similar stone for the hearth pad under your wood stove or for a backdrop wall behind it. Matching materials create visual cohesion that makes your outdoor kitchen look planned and professional rather than like features added at different times without consideration for the overall design.
Fuel Selection and Storage for Outdoor Use
Choosing the right firewood makes a substantial difference in your experience with outdoor wood heating. Not all wood burns the same, and what you use affects everything from how often you reload to how much smoke your neighbors notice.
Hardwoods like oak, hickory, maple, and ash are ideal for heating applications. They burn longer and hotter than softwoods, meaning you add logs less frequently throughout the evening. The denser wood also produces better coal beds that radiate heat even between active flames.
Softwoods like pine, fir, and cedar ignite quickly and make great kindling, but they burn fast and produce more creosote buildup in your chimney. Save softwoods for starting fires or for your pizza oven where quick, hot burns are actually desirable.
Moisture content is critical. Wood needs to be split and stacked for at least six months, ideally a full year, before burning. Wet wood produces excessive smoke, burns inefficiently, and creates dangerous creosote accumulation. A simple moisture meter removes the guesswork. You want moisture content below 20 percent for clean, efficient burning.
Storage location matters for outdoor applications. You need weather protection but also good airflow. A woodshed or covered rack keeps rain and snow off while allowing air circulation that continues the drying process. Position your storage conveniently close to both your pizza oven and your heating stove so you're not trekking across the yard in the dark to grab more fuel.
Stack wood properly with bark side up if the pile is exposed to weather. This sheds water better than bark-side-down stacking. Leave space between rows for airflow. Elevate the bottom layer off the ground using pallets or pressure-treated lumber to prevent moisture wicking up from the soil.
Operating Your Patio Heating System
Running a wood stove in an outdoor setting is simpler than indoor installations in some ways and more challenging in others. The open air helps with combustion and draft, but wind and weather create variables you don't face indoors.
Start fires using proper technique with crumpled newspaper or natural fire starters, small kindling, and progressively larger pieces. Avoid lighter fluid or other petroleum-based accelerants, which create dangerous flare-ups and leave unpleasant chemical odors. In outdoor spaces where you're likely cooking and eating, you definitely don't want fuel smells competing with food aromas.
Wind affects your fire significantly. Strong winds can blow smoke into seating areas or even back down the chimney when the stove isn't running hot. Positioning your chimney termination high enough above your roof line helps prevent downdrafts. The standard requirement is at least 3 feet above the roof penetration and 2 feet higher than anything within 10 feet horizontally.
On extremely windy days, you might struggle to maintain consistent fires as gusts steal heat and disrupt the draft. Some homeowners install wind guards or position their stoves in locations protected from prevailing winds. Others simply accept that the windiest days aren't ideal for outdoor wood heating and use those occasions for indoor entertaining instead.
Temperature swings happen faster in outdoor spaces than indoors. Your patio can go from comfortably warm to chilly within minutes when the fire dies down. This means more frequent reloading compared to indoor stoves heating enclosed spaces with thermal mass in walls and furniture. Plan to tend your fire every 30 to 60 minutes during active use.
Let fires burn down to ash before leaving them unattended. Never leave smoldering coals overnight in outdoor stoves. The risk of wind carrying sparks to combustible materials is too great. Either let the fire burn out completely or extinguish it safely with water, ensuring all embers are dead before heading inside for the night.
Maintenance and Safety for Outdoor Installations
Outdoor wood heating equipment requires regular attention to stay safe and functional. Weather exposure adds challenges beyond what indoor installations face.
Chimney cleaning is non-negotiable. Creosote buildup creates fire hazards that worsen over time. Inspect your chimney monthly during active use and clean whenever you see significant buildup. Many homeowners handle this maintenance themselves using brushes sized to their pipe diameter. The job is straightforward if done regularly before buildup becomes excessive.
Check your chimney cap and spark arrestor frequently. These components prevent rain entry and catch sparks before they can escape. Weather and thermal cycling can loosen mounting hardware over time. A cap that blows off during a storm leaves your chimney open to water damage and animal intrusion.
Inspect flashing and roof penetration seals at the start of each season. Water intrusion around chimney penetrations can rot roof decking and ceiling structures. Reapply sealant as needed to maintain weather-tight integrity. This takes minutes and prevents expensive water damage repairs.
The stove exterior may develop rust or discoloration from weather exposure, especially if your patio doesn't provide complete overhead protection. High-temperature paint designed for wood stoves can refresh the appearance. Clean the stove thoroughly first, removing any rust with a wire brush, then apply paint according to manufacturer directions.
Glass doors on outdoor stoves often collect more residue than indoor installations due to variable burning conditions. Clean glass when cool using products specifically designed for wood stove glass. Regular cleaning is easier than letting buildup accumulate to the point where it requires serious scrubbing.
Store fire tools and accessories in protected locations when not in use. Pokers, ash shovels, and cleaning brushes rust quickly when left exposed to weather. Hanging them inside your outdoor kitchen cabinets or in a nearby shed keeps them functional longer.
Creating the Complete Outdoor Entertainment Experience
Wood heating becomes one element in a larger outdoor living ecosystem that works together to create memorable evenings. Think about how all your outdoor features support the experience you want to provide for family and friends.
Lighting plays a crucial supporting role. The firelight provides beautiful ambient illumination, but you need additional lighting for safety and function. String lights overhead create festive atmosphere without harsh brightness. Path lighting guides guests safely between different patio zones. Task lighting over food prep areas in your outdoor kitchen enables cooking after dark.
Sound matters too. A quality outdoor speaker system lets you set the mood with background music that complements rather than competes with conversation. Position speakers to provide even coverage without creating loud spots where people have to shout over the volume.
Comfortable seating keeps guests lingering longer. Outdoor furniture has improved dramatically in recent years, with weather-resistant fabrics and cushions that actually stay comfortable season after season. Invest in quality pieces positioned around your heat source at distances that balance warmth with conversation distance.
Side tables scattered throughout the seating area give guests places to set drinks and plates. Nothing kills a relaxed vibe faster than having to hold everything or balance plates on laps. Simple outdoor tables placed strategically make a noticeable difference in how comfortably people settle in.
Consider adding a small refrigerator or beverage cooler to your outdoor kitchen area. When the party moves outside around the fire, having cold drinks within reach beats repeated trips indoors. The same goes for having basic supplies like napkins, utensils, and serving pieces stored in outdoor cabinets.
Extending Your Outdoor Season
The real value of patio heating reveals itself at the edges of the outdoor season. Those crisp fall evenings when leaves are changing colors, or early spring nights when the first warm days arrive but temperatures still drop after sunset - these become prime outdoor entertaining times when you have proper heating.
Fall gatherings around the fire with cider, craft beer, and heartier foods suit the cooler weather perfectly. The wood fire keeps everyone comfortable while the seasonal shift creates natural opportunities for different menus and atmospheres than summer cookouts.
Winter use depends heavily on your climate and how much cold weather you can tolerate. In moderate climates, winter nights with temperatures in the 40s become completely manageable with a wood fire burning. Add some blankets, serve warming foods and drinks, and you've got unique entertaining opportunities when most people are stuck indoors.
Spring shoulder season extends significantly with heating capability. Those April and May evenings that are beautiful during the day but still chilly after dark become prime outdoor time when you can fire up the stove.
The psychological effect matters as much as the physical warmth. Having heating available makes people more willing to venture outside when temperatures drop. Instead of everyone automatically assuming it's too cold for the patio, they know you have a solution that makes outdoor time comfortable.
Holiday gatherings take on special character around outdoor fireplaces.Thanksgiving dinner cleanup becomes an excuse to head outside with coffee or after-dinner drinks. Christmas parties can include outdoor time if you've created a welcoming heated space. New Year's Eve celebrations around a fire have a memorable quality that indoor parties sometimes lack.
Making the Investment Decision
Adding quality wood heating to your patio represents a meaningful investment, but one that pays returns in extended use and enhanced experience over many years.
Budget for the complete installation including the stove or fireplace unit, all necessary chimney components, hearth protection, installation labor if you're not DIYing, and any patio modifications needed to accommodate the new feature. Total costs typically range from $2,500 to $8,000 depending on the scale and complexity of your project.
Consider this investment relative to other outdoor improvements. A wood heating system costs roughly the same as high-end outdoor furniture or a built-in grill upgrade, but it fundamentally changes how you use your space rather than just providing incremental improvement.
The value proposition extends beyond dollars. Quality outdoor living spaces increase property values, particularly in markets where outdoor entertaining is part of the lifestyle. Buyers appreciate move-in-ready outdoor kitchens with multiple features that show the previous owners took outdoor living seriously.
Operating costs remain minimal once installed. Firewood prices vary by region but generally cost far less than propane for patio heaters or electricity for outdoor electric heaters. Many homeowners with property harvest some or all of their own firewood, reducing costs to nearly nothing beyond the labor involved.
Maintenance expenses are modest when you handle routine tasks yourself. Annual chimney cleaning supplies cost under $50 if you do it yourself. Professional chimney sweeps typically charge $150 to $300 for outdoor stove inspections and cleaning. Compare this to the ongoing cost of filling propane tanks or running electric heaters for hours.
Taking the First Steps
If you're convinced that wood heating belongs in your outdoor entertainment space, start by assessing your existing patio layout and structure. Take measurements, note overhead coverage, and think about where a heating element fits naturally into your traffic flow and seating arrangement.
Research wood stove models appropriate for outdoor installation. Not all stoves are suitable for weather-exposed locations. Look specifically for units marketed for outdoor use or those with weather-resistant finishes and construction.
Check local building codes and permit requirements. Most jurisdictions require permits for wood burning appliance installations even in outdoor settings. The permit process ensures your plans meet safety standards and provides documentation that may matter for insurance or future home sales.
Decide whether you're tackling installation yourself or hiring professionals. If you're reasonably handy and comfortable with home improvement projects, wood stove installation is achievable with careful planning. For complex installations involving extensive structural work or if you're uncertain about any aspect, bringing in experienced installers makes sense.
Plan your wood storage solution before the stove arrives. Having a place ready to stack a season's worth of firewood means you can start enjoying your new heating feature immediately after installation rather than scrambling to solve storage issues.
Consider timing your installation for off-season when you're not actively using your patio for entertaining. Spring or summer installations give you time to complete the project carefully and accumulate firewood before the weather turns and you actually need the heat.
The Transformation Waiting to Happen
Your outdoor entertainment space has incredible potential waiting to be unlocked. That patio or deck that sits unused half the year could become your favorite room in the house - the place everyone wants to be regardless of the temperature.
Adding wood fired heating extends your outdoor season dramatically while creating the kind of memorable atmosphere that defines great gatherings. The investment is meaningful but not unreasonable. The installation is achievable for DIYers or readily available through professionals. The return comes in countless evenings spent outside when you otherwise would have been stuck indoors.
Imagine October evenings around the fire with friends, the pizza oven fired up for late-season outdoor pizza nights. Picture spring gatherings starting earlier in the season because everyone knows your patio is comfortable even when the sun goes down. Think about those spontaneous weeknight dinners outside just because you can, thanks to reliable wood heat taking the chill off.
That's the transformation waiting in your outdoor space. The grill and pizza oven start the story, but adding wood heating to your patio completes it. You'll create an outdoor room that works as hard as any space in your home, providing comfort, atmosphere, and endless opportunities to enjoy life outside your four walls.